Saturday, April 14, 2007

Gunks- High Exposure 5.6***


High Exposure is probably the most well known climb in the Gunks and is definitely a classic. First climbed by Hans Kraus and Fritz Wiessner in 1941, it went unrepeated for two years because of the intimidation factor. The first pitch ends on this belay ledge and is a bit of a rope stretcher. The two people on the ledge are Angelo Urrico and his wife. Angelo is a guide with Alpine Endeavors and originally from the Bronx's.


The meat of the climb is just off this belay ledge. You have to climb up the corner and out from under the ceiling. It is fun climbing but while coming from under the roof there is about 100 feet of free air under you. It took me a couple of minutes to calm my panic before I went around the roof.

This is a picture just after I came around the roof. You can see Angelo and his wife on the third repel below me.
Definitely my most memorable climb at the Gunks.

Sunday, April 08, 2007

Gunks- RMC 5.5 * 1st pitch


Another classic at the Gunks. First climbed in 1948 and my first use of an old rusty piton. This climb included face, crack and a bit of chimney climbing. The belay ledge is above and to the left. The climb continues to the left of the belay ledge.

Gunks- RMC 5.5 * 2nd pitch


A beautiful upper pitch with lots of horizontal ledges for plugging gear.

Gunks- Betty 5.3 **


Betty is a classic. First ascent in 1941 by Betty Woolsey, it is described as a route that involves all types of climbing making it people's first real rock climb.

Marty lead both pitches to the top and set the rope for my mock lead. It was great, I could just sew it up where ever I wanted. The tree above me was the belay ledge.

The Gunks!

If you want to learn trad, this is the place. There are 4 main faces and I climbed on 'The Trapps' for all 3 days. This 'face' is 1.8 miles long and is about 200 to 300 feet high.


The first route went up in the 1940's on quite primitive gear. Most in a ground up fashion. In the 1980's went bolting was introduced to North America, the Gunks established itself as a trad area and no new bolts were allowed, only existing pitons and bolts. No sport climbing here!


I had an absolutely excellent time. The first day I climbed about 5 multipitch (two or three pitch) climbs, all of them Gunk Classics. Day two I started my trad course proper. It started with basic review of placements, anchors and rope work. For the rest of the day I did mock leads and Marty analysed must placements and anchors. That day I 'lead' two 3 pitch routes.


The next day we climbed a Gunks Classic "High Exposure". It should be called Shit Scare or Sphincter Spasm or something that implies the significance of that 'high exposure'. High Exposure is a 3 pitch climb with the crux being at the onset of the 3rd pitch. You climb an easy face to get under a roof. Using an under cling, you step onto a small ledge and reach way out and above to a nice hold you can't see. The problem is that you have about 120 feet of free air under you. This was the scariest 5.6 I have ever climbed.

This is a picture of one my guides climbing High Exposure with his wife. She is sitting on the belay ledge an he is just under the roof section. My hands sweat just looking at this.

After this, I did a mock climb of a 3 pitch route. The placements were few and far between making me run out the climb in places. What an excellent way to get your feet wet for trad climbing.

More pics to come on future posts.


Thursday, March 29, 2007

Gunks In 3 Days


With luck I will be climbing at the Gunks Sunday, Monday and Tuesday. The weather might actually agree...right now it looks like it won't rain but the temps are 1-3 degrees, kind of cold. It might warm up. If you are curious here are a couple of links to area websites.

Gunks.com is a website about activities in the Gunks including rock climbing. It has a limited list of routes. It does list 'must do' routes and ones good for TR and etc. Also has some good trad advise.

NEClimbs is an extensive North Eastern States Climbing website. Lots of great links locally and globally.

Alpine Endeavors is the guiding company that I am going to take some lessons with if all works out.

Hopefully I will have some good trip reports.

Monday, March 19, 2007

Food for thought on the Gri-Gri

I posted an incident of how I was accidentally dropped a couple of weeks ago. This was secondary to improper use of the Gri-Gri. I posted a link to the Petzl website concerning the proper use of the Gri-Gri for lead belay.

Last night Leo told me that he was going give a free course on a standardized way of using the Gri-Gri for lead belay. It was not the way recommended by Petzl!!! I was initially concerned. I listened to his argument but I was not totally won over. I came across a different source concerning the use of a Gri-Gri for lead belay that supported Leo's argument. This is the page;

http://www.8a.nu/eng/articles/grigri.htm

Regardless, I have been climbing on and off since 1995 (steady for the last 5 years) and I have never heard of a failed belay with the use of a tube belay device (ie ATC). My fall was the third failure of belay in St. John's using a Gri-Gri. I am not saying it is unsafe, but I will say it is a lot harder to lead belay. Be EXTREMELY cautious when learning to belay with the Gri-Gri and going to Leo's information session should be at the top of your 'to do' list.

Noel

Sunday, March 18, 2007

Yellow Fever


Yellow Fever 5.9 is a classic climb on Main Face. The movement is consistent and fun with a few high steps. There is one bolt about 10 meters up and 2 top bolts for anchors. It is about 25 meters in height.
This climb changed Main Face for me. Prior to climbing Yellow Fever, the only climbs I had done on Main Face were Hucuna Matata and Flaccid. I usually went to Spankies Playground.
Little did I know what I was missing. I spent the rest of the summer exploring Main Face and loving it. The rock is solid and for the most part friendly.
Newfoundland is a tricky place to learn trad climbing. Cracks here are not very consistent and vary greatly in width. You just don't get nice easy splitters. The other thing is that there are not a lot of developed 5.2 to 5.8 trad climbs, especially at Flat Rock.
New areas are opening up!!

Saturday, March 10, 2007

Flacid Ledge


Flacid Ledge is a small face about 1/3 in on Main Face. The climbs are short but nice and it has an elevated belay ledge that is easy to scramble to.

1. Size Matters Not 5.11a. I have never climbed it but I am told it is nice. 3 bolts plus top anchor.

2. Flacid 5.10a. 3 bolts plus a piece of pro in the crack. Requires a small traverse above the first bolt which I have never liked. The anchors are above the top block and it is a little awkward to get to.

3. Homer Erectus 5.9. A good easily protected crack. Start on the arete below the roof and work up in to the crack. Two top anchors were place last summer by Jay.

The two climbers have a top rope placed on Flacid.

Thursday, March 08, 2007

Four by Fours

I have entered the last phase of the training program, Power Endurance. This phase hurts a lot! When training for endurance, your goal is to climb a lot with out a burn. Training power, your strength fades before you get pumped. Power Endurance is the game of chasing the burn. You are seeking that deep down nasty fire in your arms and then push it as far as you can...Nasty!

Four by Fours is an exercise to reach the burn. Choose two climbs on one wall, the first should be an on site route, one you can lap a couple of times. The second should be a red point project (it should be hard for you to complete). Climb the on site, lower off and then the red point route to your high point, lower off. Start again with the on site and red point with no rest. If the arms aren't burning then the climbs are too easy.

Try to stay on through the burn because this is where the gains are made. It is also important to learn to hang on during a burn so you can get that desperate clip instead of falling.

Saturday, March 03, 2007

The Drop!

Last Tuesday night, I was dropped, to the horror of both Bob and me. What exactly happened I can't be sure because it happened so fast, but here are the facts as we remember them.


I was lead climbing a route on an overhanging route in the gym. Bob was belaying me using a Grigri. Both of us had begun using the Grigri for lead belay last summer. I was on the hold I use for clipping the third draw when I exhausted and dropped. I had not reached for the rope to clip nor did I give my belayer any warning. I fell and began to feel the rope take at the point I expected, about 6 feet. Just as my fall was beginning to arrest, I dropped to the ground, squarely on my back. I was not significantly hurt because my free fall to the ground was perhaps 6 feet. This is really bad because 6 feet could have been 60 feet and this could be accident report to be published in Rock and Ice and not my blog.


So what happened! Bob honestly couldn't remember what he had done to let me drop but I think we figured it out. Bob's left hand had rope burns from trying to arrest my free-fall with his non-brake hand above the belay device. In Bob's attempt to catch my fall, he re actively (and inappropriately) opened the cam on the Grigri with his left hand. This a similar motion that one would do to feed out slack when belaying a lead climber. This is easily done when the cam is partially or fully weighted...we tried it! I think the major fault comes the way Bob was taught to lead belay on a Grigri.


Bob was taught that when you feed rope to a climber, you wrap the rope as shown in the picture, place your right hand over the right side of the device with your thumb over the cam. To feed rope, you depress the cam with your thumb and pull out rope with your left hand, if the climber fall, your right hand has not left the rope (brake hand). Fine in theory but not in practice. My guess is that when I fell, Bob had his Grigri set like this and re actively grabbed the cam instead of just grabbing the rope with his brake hand. This is easy to do because it is familiar. What make this set up worse is the looping of the rope. The rope requires friction or a 'kink' for a belay device to work. With the rope looped and not kinked it feeds quite freely, great for feeding out rope but not so great when you are falling with the cam held open. The reason for teaching this belay technique is to follow the mantra of your break hand must never leave the rope. This is very true of a tube device but I don't think it holds true for an auto-locking device. I would have been safer with no hands on the rope.

http://en.petzl.com/ProduitsServices/GRIGRI%20experience.pdf is a link to the Petzl web page explaining what technique they endorse for using the Grigri for lead belay. In short, the brake hand leaves the rope, holds the body and not the cam of the belay device while the left hand feeds out the rope and them the right hand immediately returns to the brake side of the rope. They also have a little cartoon of feeding out slack with a thumb on the cam and a skull and crossbones beside it. I guess I know why.

Regardless of all this, I am still concerned. I went to Rockclimbing.com and searched the forum for drops with a Grigri. Quite the topic! There are two major camps: 1-grigri's encourage lazy belay habits, inattention and have a long learning curve to become proficient with lead belay while tube devices are simple and reliable. 2-Grigri's are safer because of the auto-lock feature. If the belayer is injured (rock fall etc) the climber is still safe. Valid points on both sides. The other point made was it is not the belay device's fault for the fall but he belayers inexperience.

I am very glad this happened at the gym where help was readily available and I am so lucky that the device partially caught or it would have been a 15 foot back slap. Out at Flat Rock the fall could have been a lot worse.

I can't blame it all on Bob, lack of communication on my part definitely contributed. I knew I was going to drop and I should have warned Bob by yelling 'falling' or something. That would have allowed Bob more time to prepare to catch me instead of instinctively trying to catch my fall.

This post was not to rag on Bob, I know he is very careful and knows the full impact of proper belay technique. The purpose was to highlight the pitfalls of one particular belay technique, what should be the proper technique and to explain what happened at the gym.

Remember..."A smart man learns from his mistake, a wise man learns from the mistakes of others."

Noel

Saturday, February 24, 2007

Topsail Head

Possible project for the summer!?! This is a picture of Topsail Head. I believe the area outline in red could be good. The approach from the top is sketchy because it angles off at about 25 degrees. The rock is solid and it looks very fectured. A bottom approach may be plausible depending on the stability of the talus field (green).


Bob and I have rapped down into the blue section, it is short but well featured. The lower wall is entirely unknown.

The exposure from the top is incredible and could make easy climbs pretty exciting.

I guess you can tell I am getting a little itchy to get outside.

Friday, February 23, 2007

Strength Training on Lead

Exercise "Clip to Clip"

Choose a hard redpoint lead project. After a good warm-up, climb to your high point and lower off. Pull your rope and then immediately start again. Climb to the first draw, clip and lower off. Quickly shake out, clip the second draw and lower off, so on and so forth. Be careful on overhanging routes as the higher you get the bigger the pendulum if you fall close to the ground.

This is great for working a route into submission but you get most familiar with the lower section. It is also good practice for clipping with flaming forearms. To get the best strength benefit it needs to be a hard project, not something you can top out.

Wednesday, February 14, 2007

Winter Training


Well, it is that time of year. I have been off real rock for about 6 months and I am starting to get REALLY itchy. I am also planning a weekend trip to the 'Gunks' in early April so it is time to get in shape and hopefully a little leaner.


A little inspiration... This is the 'Trapps" one of several huge crags at the Gunks, Upstate New York. There are over 1500 established routes. It is hard core trad climbing with restrictions on bolting placed in the 70's, only the rap anchors have fixed pro.

For the next 3 weeks is a Power Phase. Three climbing work outs per week. These consist of a warm-up, climbing and power training.

Warm-up is an thing that gets the blood flowing. In the gym it is 4 easy laps and at home it is 3 circuits of 15 squats, 15 crunches, 10 dips and 10 pull-ups.

Power climbing is basically climbing at a point where muscle exhaustion occurs in less than one minute. Obviously bouldering fits into this but my focus is sport/trad climbing. I choose a route at my extreme red point level (Hard 10 or 11a) and work it. Start from the beginning if you fall because the point isn't climbing the route but exhausting the muscles.

Another exercise Bob and I like is something I think of as progressions. Choose a red point project and climb the first 3 moves and step off. Repeat this after a short rest (<15 class="blsp-spelling-corrected" id="SPELLING_ERROR_9">maxi um, and finally 3 moves.

4 by 4 is another useful exercise which can be used for power or power endurance depending on your route choices. For power you should find a wall with a red point project and an easier climb together. Climb the project to the high point and fall. Immediately get on the easy one and top it. Lower off and go straight to the project. Repeat this 3 to 5 time or until crying.

Do 5 sets of "exercises" all together. Follow this by a a set of rock rings or hang board and then 3 sets of weighted pull-up (7 reps max).

Stay tuned for other power exercises for climbing.

Saturday, October 07, 2006

Periodization

If you are under the age 15 this post ain't for you. Periodization is a training technique used to improve overall climbing. Kids under 15 just need to climb like crazy because your body doesn't really get any benefit for this type of training. Look at all the pre-teen and teen climbers hitting 5.13 and 5.14 after only a couple years of climbing...You don't need it.

For the rest of us it is a battle, and then like myself... A war. I have read a lot on training and it boils down to some very simple ideas. Most of us don't train, we just climb. We work a project after a couple of warm-up laps, flail for a while and go home. This is fun but it is not training. We plateau soon enough, I was stuck at 5.10a for 2 years. To become better climbers we must work weaknesses and become systematic in our approach and this is where periodization comes in.

Periodization is training in block intervals on one type of climbing; endurance, power or power-endurance. Endurance is very important on longer route but also with changing styles of climbing. It takes much longer to climb a sport route than top rope and likewise longer still to climb trad. Power is important for bouldering and sport climbing. Power is called on to get that one HARD move. Power-endurance is needed when you feel that deep down nasty pump just as you are trying to make that next clip. It is being able able to climb for a period at near maximum power. We should train these individually to get the most benefit.

Bob and I have been following a 4-3-2-1 periodization schedule and I have seen good results (Over the last 12 months I have gone from climbing 5.10a to 5.10d and working my first 5.11.). It works like this;

  1. 4 weeks of endurance. Easy climbing at 2 grads below your onsite grade. Continuous climbing (up and down climb without touching the floor) for 10 minutes then switch belay. Some nights we would climb slightly harder routes but do laps (ie climb up and lower off). You should not feel a heavy burn doing this, if you are get on something easier.
  2. 3 weeks of power. 10 minute intervals of redpoint climbing or bouldering. One routine we use is to climb the first 3 moves then lower off, then 4 moves, lower, 6 moves lower, top out or high point and lower and then the first three again.
  3. 2 weeks of power-endurance. Here you want to chase the burn. You want that nasty deep burn every time you get on the wall. If you get the burn in less than 5 minutes...Too hard. If you last more than 10 minutes...Not hard enough.
  4. 1 week of rest. No climbing just allow yourself to heal before the next series.

Very impotent tips;

  1. Always warm up with easy laps. If you don't warm up well you are much more likely to get injured.
  2. Drink water while you are working out. Dehydration stops the body from performing well.
  3. Have a protein shake with in 30 minutes of the end of the workout. You body needs the protein substrate to build muscle and it is most effective when you are pumped.
  4. Take you vitamins. Vit C helps rebuild proteins (ie muscle) and a multi-vit will make sure you aren't missing any important things.
  5. If you don't have power you have nothing to endure! You should be be doing 3 sets of pull-up daily 5 times per week. Aim for 10 to 12 reps. If you can't get 10, do as many as possible and do the rest as negatives. If 10 is easy, do 5 to 10 Frenchies (Pull-up and hold at the top for 3-5sec then lower, pull up and then lower to 90 degrees, lock off and hold for 3-5 sec then lower and pull up and lower to 125 degree, lock off and hold for 3-5sec...that is one rep).
  6. Power is related to your strength to weight ratio. The heavier you are the worse it is. It is easier to loose weight than to gain strength. Cut out junk food, cut out between meal snacks. If you eat a reasonable diet and you are still not at your ideal climbing weight start running. 20 to 30 minutes 3-4 times per week.
  7. Train antagonistic muscles 2 times per week. These are the opposing muscles which you use for climbing. Injure can occur if a balance is not kept. A basic chest, tricept and shoulder workout will do fine. (Push-up or bench press 3 set of 10, tricept dips or extensions 3 sets of 10, shoulder press or handstand press 3 sets of 10 or max)
  8. Train core 2 times per week.
  9. With the above periodization, climb 4 times per week with endurance and power-endurance, 3 times per week with power (Needs more recovery).

SO...over all you should be climbing 4 times per week, running 3 times per week, working antagonistic and core muscles 2 times per week and following a reasonable diet. Post a comment if you have any questions or comments.

Noel

Saturday, September 23, 2006

Nubbin and others


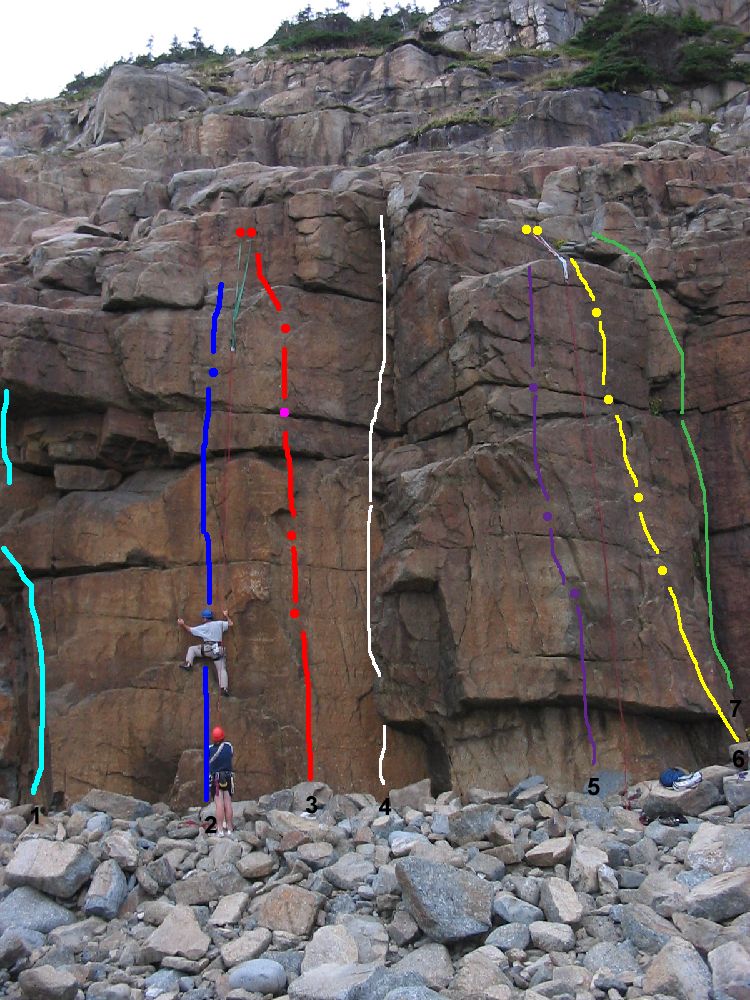
Bob, Tak and I were top roping 'Nubbin' when I took this picture. Tak is climbing and Bob is belaying/bottom anchor. The top rope anchor is set on two bolts which can be reached by carefully traversing right from the Iron Hand Rap Anchor. The second rope is over Candy. I almost have seven routes in this picture.

1 Farewell to Arms 5.11b A difficult trad climb I have never been on.

2 Nubbin 5.10c Trad climb with one bolt protecting the crux.

3 LSTD Project 5.11a/b Just put up this year. Three bolts and a piece of pro.

4 A Few Tense Moments 5.8 Trad climb in the corner. You can exit to the top of Nubbin.

5 Piece of Shit 5.10c/d Jays un-named route. I slashed my finger on it the last time I tried it.

6 Candy 5.7 Easiest sport line on main face. This route allows easy access to the top of Iron Hand and all the above routes.

7 Ivan's Corner 5.6 One of the original trad lines that has not seen much activity.

Wednesday, September 13, 2006

Hakuna Matata 5.9


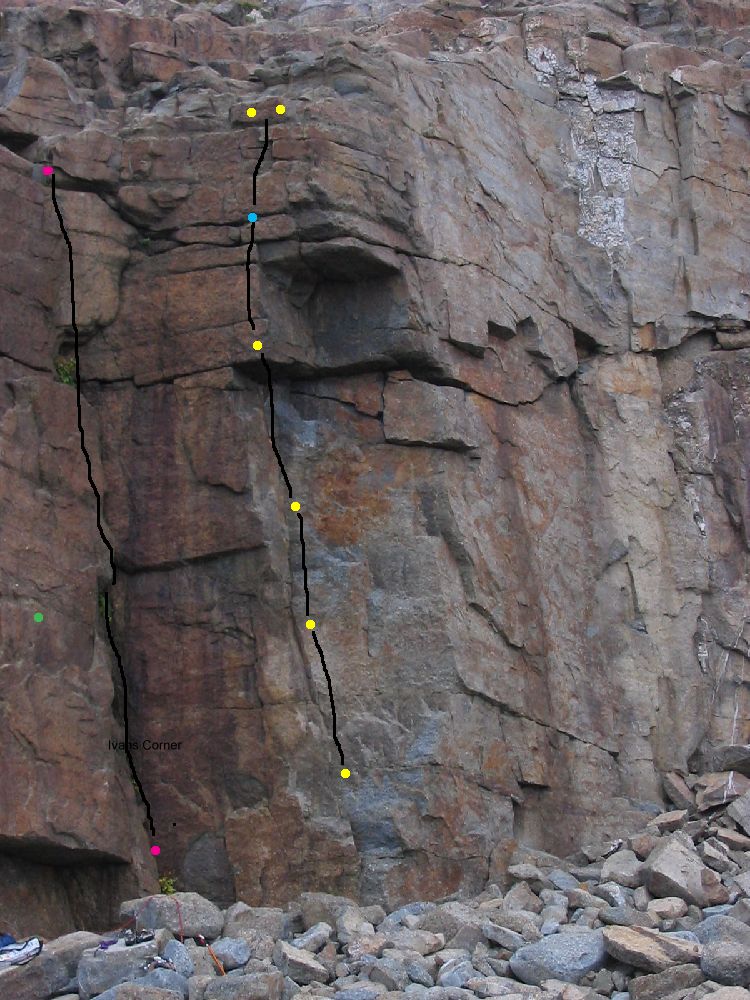
Hakuna Matata is a nice moderate sport climb. The first bolt is at shoulder height. This is because of the shifting boulders at the base. It used to be at about 10 feet. It moves up the obvious corner to the roof where it gets interesting.

The 4th bolt is well placed just above the roof. There is a long reach to the first horizontal crack. It feels quite airy because you are just over the roof. Once into the cracks it is quite straight forward. There is a nice crack for gear (blue dot). The anchors are just above.

To the left in the corner is Ivan's Corner (5.7). This is a old trad climb. It shares the same start as Candy with the first bolt of Candy in green.

Saturday, September 09, 2006

Iron Hand 5.9+


Iron Hand is one of the earliest established route on Main Face rated as 5.9+. It climbs like a 5.10a/b.

Start in the corner with a mantle on the first ledge. Reach into the corner and work up to the ledge under the ceiling. Traverse left then follow a series of lay backs up to the anchors.

The anchors at the top of Iron Hand were replaced this summer by Jason Wall. Two lengths of SS chain are on bolts and are much better than what was once there.

The top of Iron Hand is easily accessed by walking over the ledge from the top of Candy.

Candy 5.7

Candy is the route in black on the right. It starts in the corner and travels left after the 1st bolt. Just above the 2nd bolt is a nice jug which leads into the horizontal gear crack. Top out after clipping the 3rd bolt onto a nice wide ledge where the top bolts are placed.

The route beside it is un-named and is about 5.10c/d. Jay has the first ascent and therefore the right to name it. I asked him what he was going to call it and his reply was "What...that piece of shit!?!" So by default I guess the name is... Piece of Shit.

I like the Piece of Shit. You start under a small ceiling and reach the first large horizontal ledge. Then you smear both feet onto the bottom of the face and reach for a crimp with the right. With no feet and one crimp you reach left for a vertical crack. This allows you to reposition your feet and gain the next horizontal crack. There are 2 bolts and a gear placement. We are going to place a 3rd bolt above the gear placement to primarily keep the route to the left side of the face. Currently people are just using the last bolt on Candy which is actually off route. Try out the piece of shit for yourself.

Friday, September 08, 2006

Morning Climb

Bob and I are going climbing tomorrow at 6:00am at Main Face (Sat).