Thursday, February 21, 2008

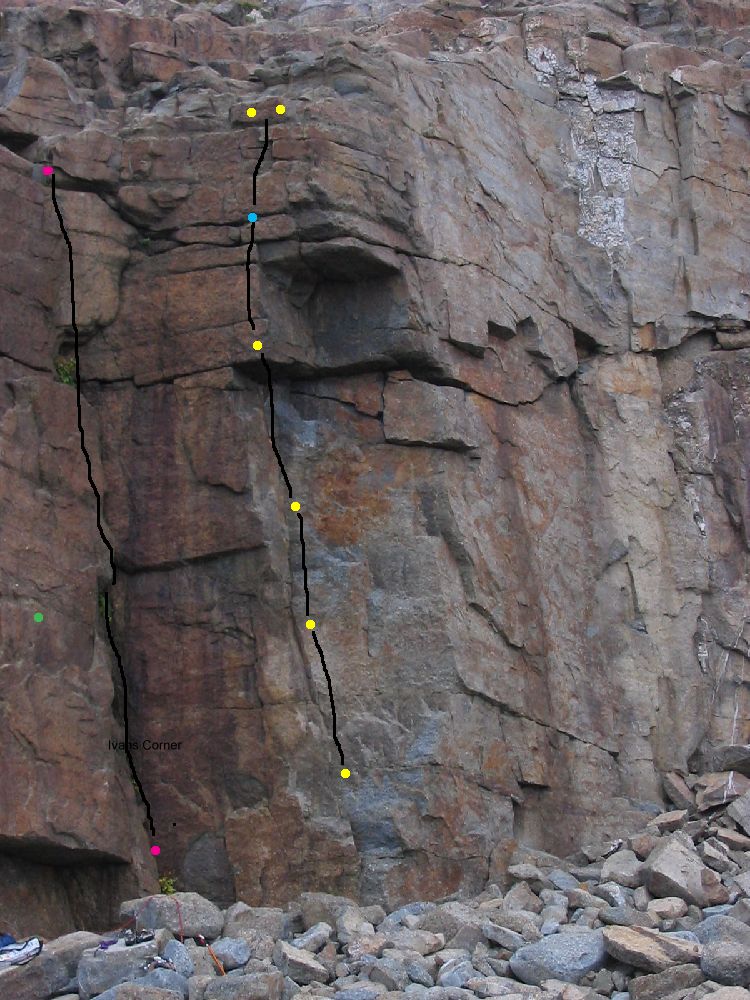
Yellow Fever Ledge


I am starting to get anxious for summer. Jay and Bob on the ledge.

Tuesday, February 12, 2008

Coincidence

I spent the weekend in Banff for a conference. I was quite surprised to find out that the place I was staying had converted a squash court into a climbing gym. I had to go check this place out and get some training in.
Mike Quigley was the guy working and I had to get my "belay test" from him. After, we started together. I told him where I was from and he says "You wouldn't happen to kow this guy. I met him in Mexico. Jay something....". It turns out that Jay and him climbed together for a couple of weeks. Like Jay, this guy takes his climbing pretty serious. Curently he is training for a trip to Nepal next summer.
Jay spoke highly of Newfoundland climbing and he is totally stoked about coming out here some day. He was very interstested in getting out to Devils Bay.
It is a small (climbing) world.

Wednesday, February 06, 2008

Power Training

Tonight is a power training night. Warm up as usual with technical endurance. Find a truely difficult project,boldering or route. Try some progressives.

Progressive: First 3 moves of problem. Not first hand holds but first MOVES. Shake out and then the first 3 again. Shake and work the 3 to 4th move. Shake out and then the first 4 moves. Then the first 6 moves. Then 8 if possible. Finish with the first 3 moves. If you are able to climb beyound 8 moves in a row then the problem is not hard enough. If you cannot get pas the first 4 moves that is OK, just repeat the first for for the total number of sets.

Try to do progressives on 3 to 5 different problems.

Finish the workout with a Rock Ring workout. For those with attitude...do three sets of frenchies after the rock rings.

Power Training

Monday, February 04, 2008

Psych Test!

Leo discussed a concept directly out of "The Rock Warriors Way". It had primarily to do with possibilities and positive thinking.

Tough climbs are hard and can be mentally defeating. "That hold is shit." "I can't stick that sloper" or "That is a dangerous clip." All these negative thoughts can stop you in your tracks before you even leave the ground. Instead, look at the positive attributes of the climb. You know it is hard, thats what makes it a worthy climb. Whats good about it? Does the bad sloper have a sweet spot? Is there a safe clipping position? All these questions can unlock what seemed like an impossible problem.

Take on a positve attitude. Learn from the problem. Anger will do nothing but sap your energy and blind you to the possibilities.

Tag Anyone?!

Well after a warmup and working projects Leo made us play...TAG! Nothing like making a bunch of 20 something and 30 somethings run around a gym like a bunch of kids! There is no dignity left.

All kidding aside, it was a good and challanging exersice. It forces us to stay on a wall and keep moving for 20 minutes, without being board to death, not bad.

Saturday, February 02, 2008

My Home Wall


Hard to get a good picture of the wall. This is along the back of my garage. First panel is 15 degrees, second has a 2 foot kicker then off at 30 degrees and the third has a four foot kicker and then off at 45 degrees.

For endurance, I traverse back and forth.

Tuesday, January 29, 2008

It has been awhile.

Well if there is anyone still looking at this blog, thanks for the persistence.

Leo's course is going well and would encourage anyone to drop by. Aside from a good workout, there is a lot of information being passed around. There is a good turn out each week and a number of people come by themselves and get matched up so not having a partner is no excuse.

We are getting to know one another and I think this will be great for next summer. I think most of us are chewing at the bit to get strong for outdoor climbing.

Setting: an awesome exercise!
Leo discussed setting with us about 2 weeks ago and it makes a lot of sense. Setting is having your body ideally positioned so one hand can release the wall, position it above the next hold for a count of 5 before grasping the hold. It forces you to center your weight properly and use the least energy consuming stances. Keep your hips into the wall. Do as an endurance exercise.

Friday, November 30, 2007

Sunday Night Course

Leo is talking about starting a sunday night training course for adults. It will focus on a periodization training schedule, similar to what I do now. It will be from 8pm to 11 or 12pm and will include training sessions, stretching and sport specific training. I think it will be a great motivator.

Thursday, November 22, 2007

For Bill

An early morning at Spankies Playground. Ohh to train for next summer.

Good luck to Bill who will be soon climbing at Red Rocks...lucky guy.

Power Period- 3 weeks

You should be climbing hard 3 times per week, 1 to 2 sport specific exercise work out per week and 2 antagonistic work out per week.

Examples of power work outs;
  1. Pyramids- Choose a hard red point. Climb first three moves, rest less tan 30 sec, climb first 4, rest, first 6, rest first 8 (or top out), rest the first 4. That would be one set. An alternative would be to use the same route but do the last 3 moves, then last 4, last6, then from base.
  2. Four by fours- Find 2 routes on the same wall. One should be a hard red point and the other 2 grades below. Climb the hard then immediately the easy (this is a 'rest') , back to the hard with out rest and finish on the easy.
  3. Bouldering
  4. HIT strips
  5. System training
  6. Hangboards.
  7. Campus board.

Sport specific training would include weighted pull ups, bentover row, dumbell row, bicept curls, core exercises, wrist curls. Reps should be in the 4 to 6 range except wrist curls which should be 10 to 15. Do 3 to 5 sets of each. Finish off with a hangboard or rock rings routine.

Antagonist training would include bench press, push ups, dips, tricept curls, shoulder press, lateral raise ect. Reps should be 8 to 10 with 3 sets.

If you are above ideal body weight (pinch more than an inch) diet smartly and run 30 min 3 times per week...I am in this group.

100th Post

Well, my apologies for not posting recently but I was away in Greece. I didn't go climbing but it would definitely be an AWESOME destination in the future.

This is my 100th post to the blog over roughly a 2 year period.

Saturday, October 27, 2007

Jay at Wilderness Area


This is a shot of Jay climbing at the Avalon Wilderness Area. He talks about this area like it was his favorite child. I look forward to getting out there some day.

Sunday, October 21, 2007

Endurance Night


Tonight is another endurance night. Warm up well (4 laps).

Then do 10 minute intervals of harder endurance...ie Hard enough that if you were to downclimb you couldn't stay on for all 10 min. So 1 level below onsight. Climb and lower off. See how many laps you can get in 10 minutes.

Thursday, October 18, 2007

Endurance WOD- Bouldering

Warmup
Light bouldering, standard warmup or running for 10 to 15 min.

Traverse times three.
Choose a section bouldering wall that is easy or flat (about 20 feet worth). Place a hanger at each side. Clip 3 to 5 draws on one side. Start at the other side, traverse boulder to the draws, take one and clip it to your harness (or shirt), carry it to the other side and clip it to the empty hanger. Stay on the wall and traverse/ferry the rest of the draws over. That is one set. DO three sets. Rest about 3 to 5 min between sets.

Hangboard enduro
Unweight your feet with a chair under a hangboard or small foot holds. Grab the jugs of the board. Move the right hand down to a challanging hold, hold for two seconds and bring it back to the jug. Move the left hand down to the same type of hold, hold it for two seconds and then back up. Stay on the board for 30 to 60 seconds, mixing up the holds you move to off the jugs. Rest for the same period of time that you are on.

Do a set of either rock rings or hangboard.

Cool down with some easy bouldering.

Monday, October 15, 2007

20 minutes from Hell

Work out for tuesday

Sport specific exersice (no actual climbing)

Crossfit warm-up
15 squat
10 situp
10 pullup
10 pushup
**Do circuit 3 times

Tabata day

A tabata is a cycle of exersice aimed at improving endurance or power endurance, depending on the weight chosen. The cycle goes as follows:

Choose a light weight for the exersice. The exersice should be done quickly but with control. Start by doing the exersice for 20secs (work phase) and then rest for 10 secs(rest). This would be one cycle. Enter directly into the next cycle and do a total of 8 cycles (should take 4 min). If you can't complete a cycle with good form then the weight is too heavy. Trust me, START LIGHT! Rest for two minutes then start the next exersice.

Tabata this;
1. Jumping pullups (jump slightly at the start of the pullup to unload your weight).
8 cycles then 2 minute rest.
2. Bentover row.
8 cycles then 2 minute rest.
3. Bicept curls
8 cycles then 2 minute rest.
4. Wrist curls.
8 cycles.

Now that you are warmed up, time for enduro-hangs. Use jugs on the hangboard/rock rings or chin bar. Dead hang for 1 minute. Rest one minute. Repeat times 5 total. If this is too easy for you, try bent arm hangs.

Sunday, October 14, 2007

WOD-Antagonists

Work out for monday

Warmup with 15 minute run or
15 squats
10 situps
10 pullups
10 chest dips (or 15 pushups)
* 3 sets

1. Bench press; First set- 10 to 12 reps
Second set (same wt)- controled presses for 30 sec then rest for 30 seconds- 5 cycles.

2a. Incline press; 3 sets of 8 to 10
2b. Flat Flye; 3 sets of 8 to 10
*Superset these (ie 2a then 2b then rest and repeat).

3 Dip/Leg Raise; 3 sets of max
(Do a chest dip then leg raise= 1 rep)

4a* Shoulder press; 3 sets 10/8/6
4b Bent over flye; 3 sets 10/8/6

5a* Tricept dips; 3 sets 10 to 12
5b Tricepts extensions; 3 sets 10 to 12

It's Training Time

Well it is time to start training again. I have had a fair bit of time off and I am itchnig to get back to it.

First Cycle: Endurance x 3 weeks

Climb four times per week. Repeat as many interval in your session as time will allow.

Work out one- 10 minute interval of easy climbing. Climb at least 2 grades below your onsight level. Climb the specific route and downclimb all holds. Don't touch the floor...stay on the wall for the whole 10 minutes.

Work out two- 10 minute intervals. 1 grade below onsight. Climb and lower for 10 minutes.

Work out three- 10 minutes or exhaustion. 2 grades below onsight sport route. Climb to second clip then lower. Climb to third and lower. Forth and lower until you hit anchors then repeat sequence. For harder challange, clip with the left hand on first set and right hand on second.

Sunday, September 30, 2007

Ohh the Gunks!


My trip to the Gunks in March was an awesome way to start the season. I wonder where I will go next year.

Fading Season

The days are getting shorter and a fair bit colder. I think there may only a couple of outdoor days for me left this year. I guess it is time to change gears...start training for next year!!!!

What happens to me each year is a paradox. In train all winter and try to get strong. The outdoor season begins and I start developing routes and working on trad, cklimbing well below my redpoint level. As the summer goes on I get weaker. Now in late September I feel like I can't climb 5.6.

I haven't climbed at all in two weeks so now is a good as any time to start training again.

Bob and I follow a program which I have outlined before, it works! I went up 3 letter grades in one year, 5 grades in two years. This year I am thinking about posting the schedule as we are doing it. If you are interested please leave a comment.

Noel

Saturday, September 15, 2007

Two Onsight First Ascents

We had a beautiful morning today. Bob, Peter, Tim and myself went out to Manuels for some climbing. Bob and show the boys around a little bit, established routes and lots of future potential. Then we roped up.

Peter was sporting a hangover so the lead went to Tim. He led Ankle Biter and thought it was awesome!!!! "Tons of hands and feet. Solid rock and all kinds of placement opportunities."

While he was doing that, I was curious about a short line I spied around the corner from Ankle Biter. I hopped on the sharp end and climbed a 25 foot crack (Onsight 5.7ish). I gained a ledge that was overgrown with shrubs. I built an anchor and was going to belay Bob up. Once on anchor, I could see a line on the upper face that was begging to be climbed...easy ground! This belay ledge also happens to be at the top of a ramp that can we scrambled up.

From here, Bob belayed me from the ledge with one cam as a bottom anchor. I started climbing this "easy ground" to find that my first descent placement (OO C3) was about 25 feet from Bob. From here the climb got more vertical (5.6ish) and I was able to place a nut and a couple of cams. From there it was very easy scramble to the top (5.3ish).

My first onsight FA! Arborist 5.7 can be done as a single pitch. The first crack can be avoided by going up the ramp climbing the last 2/3 at about 5.5 or 5.6.

After Tim led Ankle biter, he roped up to try out Noobie Squeeze. Peter had something else in mind for Tim. On Peters rap off Ankle Biter, he was checking out a bulging feature between the two established lines. Once Tim gain the ground just under the bulge, Peter started heckling Tim to go up the bulge. After sussing out the line for a bit, Tim went onsight over the right of the bulge and back up to the anchors on Noobie Squeeze.

Peer Pressure 5.8 (grade needs to be confirmed by Tim) was a big first for Tim. It was his first FA as well as a first Onsight FA.

Tim goes back to Ireland on Tuesday and Peter heads back to Halifax in 10 days. I would like to thank the both of them fro coming out and having a great day.

Monday, September 10, 2007

Spankies Left Side


This is a fairly good over view of the left side of Spankies Playground.
1. Toil and Trouble -5.11a
2. Taming of the Shrew -5.10b
3. Much Ado About Nothing -5.9
4. Twelth Night -5.10a
5. Cuckold -5.10a
6. Even Tide -5.7

Sunday, September 09, 2007

Bob TRing Much Ado About Nothing -5.9


This is a nice route but it is a little run out. Solid 5.9 but with out beta I found myself of route. I guess I rushing.

Noel on Twelth Night 5.10a


Saw a nice trad line with a couple of bolts further up. The bottom was nice easy climbing to the first bolt. Kinda run out between bolts and then not real nice after the bolt.
I wimped out and stick clipped the anchors from the second bolt.
If I would have stayed more right, it would have been more consistent.

Kim Climbing "Even Tide" 5.7


Kim, Bob and Myself were a Spankies today (at sunrise). Beatiful morning.


Saturday, September 08, 2007

Cemetery Face


Access: Drive west on Portugal Cove Road past Windsor Lake. Enter Portugal Cove and pass Indian Meal Line and Bauline Line roads. Look for Anglican Cemetery Road on the right. There is a pink house on the corner.
Follow this road up a steep hill and stay left at the fork in the road. The road turns to dirt by the last house. Follow the dirt road for 100 – 150 meters. There is a pull out on the left side of the road directly across from the face.
There is a path directly across from the pull out that goes to the base.
(Blue=pullout; Green=Face; Yellow=Slab)

Routes; Below is a picture of the face from the pull out. The top of the climbs can be reached by climbing the ramp at the left side of the face (double ended arrow). Above the first two climbs are bolts to secure yourself as you clip the anchors. The anchor for the 3rd and 4th routes can be gained by carefully gaining the edge of the face.


1. Delayed Gratification 5.10a. Three bolts plus anchors.
2. Grateful Dead 5.10c. 4 Bolts plus anchors.
3. Shallow Grave 5.8. 4 bolts plus anchors.
4. Shrouded 5.7
Trad plus anchors (shared with Shallow Grave).

Tuesday, September 04, 2007

Grateful Dead 5.10c

Today was the day, I sent Grateful Dead. Bob and I were out this morning. I spent some time working the top section, took a rest and then did the route. It felt so good!

I read an article on red pointing a while back. It basically discussed working a route from the top down. When working a route, most of us work to get the crux and then try to send. You figure the crux but are usually so spent, the rest of the route seems harder than it should.

The sequence after the crux should be wired before the red point attempt. Once wired, then figure out how to enter it after you have finished the crux, and then the crux. In essence, the route is broken down into small sections and you learn them from the top down, one at a time. The end result, you are most familiar with the end of the climb. On your red point attempt went you are pumped after the crux, it should be much easier knowing exactly how to finish the route off.

Wednesday, August 29, 2007

Oh SO close!

My project on the Cemetery Face is spanking me! Movement through the bottom is fine but by the time I set up for the dyno I don't feel fresh anymore. I clip the bolt above my head, which protects the move. Left hand on secure edge, right middle finger hugs a one finger scoop on top of a sloper. Right foot is solid then bring my left foot up to a small edge, breath...GO. Then the recurring nightmare kicks in. I can reach the hold, almost grasp it and then...FALLING. Damn it! One day soon.

Sunday, August 26, 2007

Manuels Face


Bob and I have cleared a path to the base of the face. To get there, drive on CBS highway (No 2) towards Manuels. Take the exit for Minerals Road and turn right. Then turn left onto country path road and follow it under the highway where it turns to a dirt road. Follow this for another 1/2 KM until it ends at a 'turn around' beside a house.
A trail continues from the end of the road. From here it is about a 15 minute hike. Follow the trail as it follows the valley flanked by the faces on the left.
After 7 to 10 minutes, look for a path forking off the main trial on the left. It is marked with 2 green trail tapes and is below the main face. Follow this trail as it meanders toward the base. It is well marked but the shrubs are thick in some places. The marking tapes are all green with two demarking a significant change in direction. There are also blue and orange tapes marking the path.
The path ends at the bottom of the face and the base of the climbs are left. The base of Noobie Squeeze is characterized by crescent shaped crack. At the top of the crack (over the lip) is the first bolt. Climb left to the obvious corner/chimney there is a second bolt on the right side toward the top of the corner. Once the top of the corner has been made, the anchors can be seen.
Ankle Biter starts on a slanting ridge about 20 feet right of NS. Follow the ridge up to the treed ledge (about 25 feet). Start climbing on the vertical face immediately above the exit of the ridge. The face eases off about 15 feet above the ridge when the climb begins to go leftward. There is a large bulging feature (don't laugh) between NS and AB that Biter follows the right flank of. Once at the height of the bulge, the top anchors can be seen.
Both routes can be easily top roped. The top can be accessed by a long scramble. Once the base has been reached via the path, follow the base to the right until you come to an over hanging wall. Scramble up the slope under the over hang. Be careful,it is always wet. Towards the top you have to do some careful 5.3 climbing on a wet face for about 15 feet to gain a treed slope. Stay left, I believe Bob has some tapes in the trees. Once thru the tree, you are at the top of the face. The tops are about 30 to 50 feet away from the tree line. Look for four bolts that are about 5 to 10 feet back from the edge. These bolts are just above the climbs. The top anchors can be reached from the edge.
Click the following link to view a road map to gain the head of the trail.http://maps.google.ca/maps?hl=en&q=&ie=UTF8&ll=47.499344,-52.970324&spn=0.020701,0.031114&z=15&om=1

Saturday, August 25, 2007

Ankle Biter 5.6

Congratulations to Bob!!! Today he sent is 2 year project 'Ankle Biter'. He has had a certain single mindedness about this project all summer. Last May he tried a first ascent of this climb and fell. He broke his ankle and was out for most of the season last year.
The first thing Bob wanted to develop this year was the line that broke his ankle. It took Bob a lot more that just cleaning the line and finding placements, that was the easy stuff. As anyone knows, after a bad fall or injury, it is really hard to get you confidence back. Many leave the sport after a bad fall... not Bob.
Bob fought to get his lead head back. He honed his trad skills and climbed the line enough to approach it with confidence. He earned this one and his smile showed it.
Ankle Biter (5.6) is about 90 feet long, starting on an arete with shallow crack up to a treed ledge (the site of the dreaded fall) 20 feet up. The it follows a well featured head wall to the anchors. There is plenty of pro eating placement though one or two spots where cams less than 1.5cm come in handy. The top has a rap anchor (3/8 rap ring ties two).


Saturday, August 04, 2007

Noobie Squeeze 5.7 Trad


Just awesome! Bob, myself and Kim went out to Manuels today and I finally sent the trad line I started in the spring.
Kim was concerned that she was a 'noobie' but we were thrilled to have her out. This climb was meant for her, or someone just like her. She has plenty of gym experience and needs some good moderate ground to get her feet wet.
Noobie Squeeze follows a nice arcing crack for the first 30 feet. Just above that is a bolt prior to getting into a wide corner.
Once in the corner, the stemming is solid but at the top are a couple of hollow sounding blocks which I don't trust to pro so I placed a second bolt at the top of the corner just prior to a small roof. This is the squeeze and the crux.
Easy climbing to the top belay bolts.
This climb is well protected with plenty of gear opportunities.
Most the route is 5.5 climbing except the corner and the squeeze which is solid 5.7. It is about 90 feet (about 28 meters).
Kim loved the route and she had a blast on Bobs project which he will send soon.

Friday, August 03, 2007

Ohh Boy!!

We were out on Tuesdays morning and I tried the next route on Cemetery Face. It is a little bit harder than I thought...OK a lot harder, but it is really fun. It will go hard 10 or 5.11a. The crux is a neat move where you either use a two finger under cling or a mono-pocket to reach over about 3 feet of featureless rock. Then it moves on to some balancy side pulls thru to the top. I figure about 4 bolts plus anchors.

The next line follows an over hanging bulge. It looks well featured but who knows. I haven't been on it yet but I am psyched!!!!

Tomorrow we are going out to the face we are working in CBS. Another line shoulld go down. We will see.

Thursday, July 26, 2007

Map to Cemetery Face

The link below is to a map of Anglican Cemetery Road in portugal Cove. The road turns to dirt and the face is across from the first obvious pullout.
http://maps.google.ca/maps?hl=en&q=&ie=UTF8&ll=47.629132,-52.831106&spn=0.019349,0.037079&z=15&om=1

Pic Cemetery Face


This is a picture of Cemetery Face from the pullout just below the face. To the left of the face is a ramp that allows easy access to the top. All the top anchors are easily reached. The face catches evening sun. At least one more line between yellow and blue. The face to the left is short but blank.

Tuesday, July 24, 2007

Cemetery Face

Two more lines were established on Cemetery Face in Portugal Cove this morning.

First was a 5.7 Trad line called Shrouded. I placed four pieces plus two top bolts. It follows an irregular crack which made placing cams problematic. It should be fine with passive pro.

Second is a 5.8 sport line called Shallow Grave. It has four bolts plus two top bolts for anchors (same as Shrouded). The line is only 20 to 25 feet high so the bolts are tight but necessary to prevent a possible ledge fall.

I see at least 2 more lines going up on this face, one an easy 5.10 and the other 5.10+ or 5.11-. We will see.

Sunday, July 22, 2007

Climbing Tuesday

Tuesday mornings forcast looks good. We will be going to Cemetery Face in Portugal Cove hoping to send a couple of new lines. Bob and I meet at Tim Horton's (Torbay and Majors Path) at 5:00am for anyone interested.

Flacid Ledge


1 Size Matters Not 5.11a Sport
2 Flacid 5.10a Sport
3 Homer Erectus 5.9 Trad

Hakuna Matata


First Line - Ivan's Corner 5.6 Trad

Second Line- Hakuna Matata 5.10a/b Sport (One Piece)

Candy's Face


Blue line- Nubbin's 5.11a Trad

Red line- The Program 5.11a Sport

White line- ? Name 5.8 Trad

Purple Line- Jay's Route (?Piece of shit) 5.10+ Mixed

Yellow Line- Candy 5.6 Sport (One peice)

Green Line- Ivan's Corner 5.6 Trad

Climbers

I have talked ot several people in the gym about getting outside (Kim, Bill, etc). I usally tell people to see this site and leave a phone number in the comments. I am very eager to bring people out but I need contact numbers.

Sunday, July 08, 2007

Jayce on Candy


I had Jayce out to Flat Rock today. We set a TR on Candy to see how he would do. Well...not one bit of fear. He is only 6 years old and he has got his first 5.7.

Next...Yellow Fever!

Saturday, July 07, 2007

Maggie 5.11a


I finally junped on Maggie on Wed past. This is Jay on top rope nearing the crux. He was doing laps and making it look easy. I barely made it thru the crux after many attempts.
AN excellent climb. **** stars for sure.

Tuesday, June 19, 2007

The two lines.


These are the two lines Bob and I were working on. Bob is on a 'mock' lead on the right side (two ropes going up). The line I am working is on the left.
It starts with the crescent shaped crack and follows into the dihedral above.
We are looking for brave soles to come climb/clean.

Serious Dude!


Bob plugging gear.


Sunday past, Bob and I were at Manuels cleaning and prepping 2 lines. This is Bob 'mock' leading his line, checking placements. This is the same route he broke his ankle on last May.
Guess what he is going to call it when he sends it!?!

Sunday, June 17, 2007

New Face in Manuels


Bob has been talking about this face for over a year now. This is the very face he broke his ankle on last year. I wondered about his enthusiasm until I got there earlier this month. It has the kind of territory both of us have been looking for... long easy trad.

We have cleaned two lines, a 5.4 and a 5.6, both about 100 feet.

Tuesday, June 05, 2007

Delayed Gratification 5.10a

Well I finally did it. The rain managed to stop long enough for the face to dry. Bob and I were out this morning and the route fell! I have been waiting about two weeks to send it but our spring weather kept me off it.

The face is in Portugal Cove at the top of Anglican Cemetery Road. The road turns to dirt and leads to Blast Hole Ponds. The face is about 200 meters in from the road and there is a pull out immediately across from the face. I have cut a path through the bush to the base. Gratification starts about 5 meters from the left side arete. There are 3 bolts plus 2 bolts for top anchors. It is about 25 feet high.

The top is easily access by climbing a 5.1 ramp up the left side. Above Gratifications the are two bolts near the edge. One of these can be clipped with a daisy in order to reach the top anchors.

The Anglican Cemetery Face seems a mouth full so I'll just call it the Cemetery Face. In keeping with the morbid theme there is another face up the road that I call the Cold Slab. It has potential for easy trad and slab/face climbing.

A second set of top bolts have been placed to the right of the Cemetery Face. These are above a trad line and a future sport route. The trad line has not been sent yet so please don't lead it. I will post when it goes down (should be soon).

Saturday, June 02, 2007

Cool Little Face

I have been curious about a small face for a number of years now. I have hiked by it a number of times, in fact you can drive to the base of it. This spring I solo top roped it and I am quite happy with it. It is slightly over hanging (like Bloodbath) and about 25 feet high. It will probably yield 4 to 5 sport routes and one trad.

I placed a set of top bolts and top solo'd one route. It pretty fun and cruxie at the top. I bolted it about two weeks ago and have not been able to get on it because of the weather (see previous post). It has three bolts plus top anchors and will go at an easy 5.10.

There is another line just beside it that I have played on but haven't completed. Definite crux move half way up (ohh 10 feet!) with a cool undercling.

There is an off-vertical crack that moves up easier terrain. I haven't been on it (yet) but it will likely go at 5.8 or less.

There are a couple of smaller slab faces in the area that may also give up a couple of climbs. More details to come when I have it a little better developed.

Monday, May 28, 2007

For the hell of it!

Boy does this weather SUCK! Bob and I have been out a few times...shivering and skittering off wet holds. Can we please get some decent #@%$& weather.

No new pictures. I have bolted a new route but haven't sent yet, probably a low 10.?. There are a couple of others on the horizon. More info when available.

Geoff and company are back from Red Rocks. A great time had by all. Leo and possibly Jay will be back from Squamish next week. In the mean time we wait for warmer, drier weather.

Noel

Sunday, May 06, 2007

Old Geezers

The time has come! The old geezers are getting out in the mornings. Bob and I got out once on a Tuesday so far and now it is definitely light enough at 5:00am. SO if a Tuesday looks good, chances are Bob and I will be out at 5:00am. Keep watching!

Top Sail Head- Second Bluff


After climbing in the Gunks, I am eager to find some long easy trad climbing. Holyrood does fit the bill, but you need an hour just to get there.
This is the second bluff at Topsail Head Beach. There are many possible lines, it is just a matter of getting on them. This is only 15 minutes from my house. One day soon I am going to throw a fixed line down this to see what it is like.
Any takers?

Saturday, April 14, 2007

Gunks- High Exposure 5.6***


High Exposure is probably the most well known climb in the Gunks and is definitely a classic. First climbed by Hans Kraus and Fritz Wiessner in 1941, it went unrepeated for two years because of the intimidation factor. The first pitch ends on this belay ledge and is a bit of a rope stretcher. The two people on the ledge are Angelo Urrico and his wife. Angelo is a guide with Alpine Endeavors and originally from the Bronx's.


The meat of the climb is just off this belay ledge. You have to climb up the corner and out from under the ceiling. It is fun climbing but while coming from under the roof there is about 100 feet of free air under you. It took me a couple of minutes to calm my panic before I went around the roof.

This is a picture just after I came around the roof. You can see Angelo and his wife on the third repel below me.
Definitely my most memorable climb at the Gunks.

Sunday, April 08, 2007

Gunks- RMC 5.5 * 1st pitch


Another classic at the Gunks. First climbed in 1948 and my first use of an old rusty piton. This climb included face, crack and a bit of chimney climbing. The belay ledge is above and to the left. The climb continues to the left of the belay ledge.

Gunks- RMC 5.5 * 2nd pitch


A beautiful upper pitch with lots of horizontal ledges for plugging gear.

Gunks- Betty 5.3 **


Betty is a classic. First ascent in 1941 by Betty Woolsey, it is described as a route that involves all types of climbing making it people's first real rock climb.

Marty lead both pitches to the top and set the rope for my mock lead. It was great, I could just sew it up where ever I wanted. The tree above me was the belay ledge.

The Gunks!

If you want to learn trad, this is the place. There are 4 main faces and I climbed on 'The Trapps' for all 3 days. This 'face' is 1.8 miles long and is about 200 to 300 feet high.


The first route went up in the 1940's on quite primitive gear. Most in a ground up fashion. In the 1980's went bolting was introduced to North America, the Gunks established itself as a trad area and no new bolts were allowed, only existing pitons and bolts. No sport climbing here!


I had an absolutely excellent time. The first day I climbed about 5 multipitch (two or three pitch) climbs, all of them Gunk Classics. Day two I started my trad course proper. It started with basic review of placements, anchors and rope work. For the rest of the day I did mock leads and Marty analysed must placements and anchors. That day I 'lead' two 3 pitch routes.


The next day we climbed a Gunks Classic "High Exposure". It should be called Shit Scare or Sphincter Spasm or something that implies the significance of that 'high exposure'. High Exposure is a 3 pitch climb with the crux being at the onset of the 3rd pitch. You climb an easy face to get under a roof. Using an under cling, you step onto a small ledge and reach way out and above to a nice hold you can't see. The problem is that you have about 120 feet of free air under you. This was the scariest 5.6 I have ever climbed.

This is a picture of one my guides climbing High Exposure with his wife. She is sitting on the belay ledge an he is just under the roof section. My hands sweat just looking at this.

After this, I did a mock climb of a 3 pitch route. The placements were few and far between making me run out the climb in places. What an excellent way to get your feet wet for trad climbing.

More pics to come on future posts.


Thursday, March 29, 2007

Gunks In 3 Days


With luck I will be climbing at the Gunks Sunday, Monday and Tuesday. The weather might actually agree...right now it looks like it won't rain but the temps are 1-3 degrees, kind of cold. It might warm up. If you are curious here are a couple of links to area websites.

Gunks.com is a website about activities in the Gunks including rock climbing. It has a limited list of routes. It does list 'must do' routes and ones good for TR and etc. Also has some good trad advise.

NEClimbs is an extensive North Eastern States Climbing website. Lots of great links locally and globally.

Alpine Endeavors is the guiding company that I am going to take some lessons with if all works out.

Hopefully I will have some good trip reports.

Monday, March 19, 2007

Food for thought on the Gri-Gri

I posted an incident of how I was accidentally dropped a couple of weeks ago. This was secondary to improper use of the Gri-Gri. I posted a link to the Petzl website concerning the proper use of the Gri-Gri for lead belay.

Last night Leo told me that he was going give a free course on a standardized way of using the Gri-Gri for lead belay. It was not the way recommended by Petzl!!! I was initially concerned. I listened to his argument but I was not totally won over. I came across a different source concerning the use of a Gri-Gri for lead belay that supported Leo's argument. This is the page;

http://www.8a.nu/eng/articles/grigri.htm

Regardless, I have been climbing on and off since 1995 (steady for the last 5 years) and I have never heard of a failed belay with the use of a tube belay device (ie ATC). My fall was the third failure of belay in St. John's using a Gri-Gri. I am not saying it is unsafe, but I will say it is a lot harder to lead belay. Be EXTREMELY cautious when learning to belay with the Gri-Gri and going to Leo's information session should be at the top of your 'to do' list.

Noel

Sunday, March 18, 2007

Yellow Fever


Yellow Fever 5.9 is a classic climb on Main Face. The movement is consistent and fun with a few high steps. There is one bolt about 10 meters up and 2 top bolts for anchors. It is about 25 meters in height.
This climb changed Main Face for me. Prior to climbing Yellow Fever, the only climbs I had done on Main Face were Hucuna Matata and Flaccid. I usually went to Spankies Playground.
Little did I know what I was missing. I spent the rest of the summer exploring Main Face and loving it. The rock is solid and for the most part friendly.
Newfoundland is a tricky place to learn trad climbing. Cracks here are not very consistent and vary greatly in width. You just don't get nice easy splitters. The other thing is that there are not a lot of developed 5.2 to 5.8 trad climbs, especially at Flat Rock.
New areas are opening up!!

Saturday, March 10, 2007

Flacid Ledge


Flacid Ledge is a small face about 1/3 in on Main Face. The climbs are short but nice and it has an elevated belay ledge that is easy to scramble to.

1. Size Matters Not 5.11a. I have never climbed it but I am told it is nice. 3 bolts plus top anchor.

2. Flacid 5.10a. 3 bolts plus a piece of pro in the crack. Requires a small traverse above the first bolt which I have never liked. The anchors are above the top block and it is a little awkward to get to.

3. Homer Erectus 5.9. A good easily protected crack. Start on the arete below the roof and work up in to the crack. Two top anchors were place last summer by Jay.

The two climbers have a top rope placed on Flacid.

Thursday, March 08, 2007

Four by Fours

I have entered the last phase of the training program, Power Endurance. This phase hurts a lot! When training for endurance, your goal is to climb a lot with out a burn. Training power, your strength fades before you get pumped. Power Endurance is the game of chasing the burn. You are seeking that deep down nasty fire in your arms and then push it as far as you can...Nasty!

Four by Fours is an exercise to reach the burn. Choose two climbs on one wall, the first should be an on site route, one you can lap a couple of times. The second should be a red point project (it should be hard for you to complete). Climb the on site, lower off and then the red point route to your high point, lower off. Start again with the on site and red point with no rest. If the arms aren't burning then the climbs are too easy.

Try to stay on through the burn because this is where the gains are made. It is also important to learn to hang on during a burn so you can get that desperate clip instead of falling.

Saturday, March 03, 2007

The Drop!

Last Tuesday night, I was dropped, to the horror of both Bob and me. What exactly happened I can't be sure because it happened so fast, but here are the facts as we remember them.


I was lead climbing a route on an overhanging route in the gym. Bob was belaying me using a Grigri. Both of us had begun using the Grigri for lead belay last summer. I was on the hold I use for clipping the third draw when I exhausted and dropped. I had not reached for the rope to clip nor did I give my belayer any warning. I fell and began to feel the rope take at the point I expected, about 6 feet. Just as my fall was beginning to arrest, I dropped to the ground, squarely on my back. I was not significantly hurt because my free fall to the ground was perhaps 6 feet. This is really bad because 6 feet could have been 60 feet and this could be accident report to be published in Rock and Ice and not my blog.


So what happened! Bob honestly couldn't remember what he had done to let me drop but I think we figured it out. Bob's left hand had rope burns from trying to arrest my free-fall with his non-brake hand above the belay device. In Bob's attempt to catch my fall, he re actively (and inappropriately) opened the cam on the Grigri with his left hand. This a similar motion that one would do to feed out slack when belaying a lead climber. This is easily done when the cam is partially or fully weighted...we tried it! I think the major fault comes the way Bob was taught to lead belay on a Grigri.


Bob was taught that when you feed rope to a climber, you wrap the rope as shown in the picture, place your right hand over the right side of the device with your thumb over the cam. To feed rope, you depress the cam with your thumb and pull out rope with your left hand, if the climber fall, your right hand has not left the rope (brake hand). Fine in theory but not in practice. My guess is that when I fell, Bob had his Grigri set like this and re actively grabbed the cam instead of just grabbing the rope with his brake hand. This is easy to do because it is familiar. What make this set up worse is the looping of the rope. The rope requires friction or a 'kink' for a belay device to work. With the rope looped and not kinked it feeds quite freely, great for feeding out rope but not so great when you are falling with the cam held open. The reason for teaching this belay technique is to follow the mantra of your break hand must never leave the rope. This is very true of a tube device but I don't think it holds true for an auto-locking device. I would have been safer with no hands on the rope.

http://en.petzl.com/ProduitsServices/GRIGRI%20experience.pdf is a link to the Petzl web page explaining what technique they endorse for using the Grigri for lead belay. In short, the brake hand leaves the rope, holds the body and not the cam of the belay device while the left hand feeds out the rope and them the right hand immediately returns to the brake side of the rope. They also have a little cartoon of feeding out slack with a thumb on the cam and a skull and crossbones beside it. I guess I know why.

Regardless of all this, I am still concerned. I went to Rockclimbing.com and searched the forum for drops with a Grigri. Quite the topic! There are two major camps: 1-grigri's encourage lazy belay habits, inattention and have a long learning curve to become proficient with lead belay while tube devices are simple and reliable. 2-Grigri's are safer because of the auto-lock feature. If the belayer is injured (rock fall etc) the climber is still safe. Valid points on both sides. The other point made was it is not the belay device's fault for the fall but he belayers inexperience.

I am very glad this happened at the gym where help was readily available and I am so lucky that the device partially caught or it would have been a 15 foot back slap. Out at Flat Rock the fall could have been a lot worse.

I can't blame it all on Bob, lack of communication on my part definitely contributed. I knew I was going to drop and I should have warned Bob by yelling 'falling' or something. That would have allowed Bob more time to prepare to catch me instead of instinctively trying to catch my fall.

This post was not to rag on Bob, I know he is very careful and knows the full impact of proper belay technique. The purpose was to highlight the pitfalls of one particular belay technique, what should be the proper technique and to explain what happened at the gym.

Remember..."A smart man learns from his mistake, a wise man learns from the mistakes of others."

Noel

Saturday, February 24, 2007

Topsail Head

Possible project for the summer!?! This is a picture of Topsail Head. I believe the area outline in red could be good. The approach from the top is sketchy because it angles off at about 25 degrees. The rock is solid and it looks very fectured. A bottom approach may be plausible depending on the stability of the talus field (green).


Bob and I have rapped down into the blue section, it is short but well featured. The lower wall is entirely unknown.

The exposure from the top is incredible and could make easy climbs pretty exciting.

I guess you can tell I am getting a little itchy to get outside.

Friday, February 23, 2007

Strength Training on Lead

Exercise "Clip to Clip"

Choose a hard redpoint lead project. After a good warm-up, climb to your high point and lower off. Pull your rope and then immediately start again. Climb to the first draw, clip and lower off. Quickly shake out, clip the second draw and lower off, so on and so forth. Be careful on overhanging routes as the higher you get the bigger the pendulum if you fall close to the ground.

This is great for working a route into submission but you get most familiar with the lower section. It is also good practice for clipping with flaming forearms. To get the best strength benefit it needs to be a hard project, not something you can top out.

Wednesday, February 14, 2007

Winter Training


Well, it is that time of year. I have been off real rock for about 6 months and I am starting to get REALLY itchy. I am also planning a weekend trip to the 'Gunks' in early April so it is time to get in shape and hopefully a little leaner.


A little inspiration... This is the 'Trapps" one of several huge crags at the Gunks, Upstate New York. There are over 1500 established routes. It is hard core trad climbing with restrictions on bolting placed in the 70's, only the rap anchors have fixed pro.

For the next 3 weeks is a Power Phase. Three climbing work outs per week. These consist of a warm-up, climbing and power training.

Warm-up is an thing that gets the blood flowing. In the gym it is 4 easy laps and at home it is 3 circuits of 15 squats, 15 crunches, 10 dips and 10 pull-ups.

Power climbing is basically climbing at a point where muscle exhaustion occurs in less than one minute. Obviously bouldering fits into this but my focus is sport/trad climbing. I choose a route at my extreme red point level (Hard 10 or 11a) and work it. Start from the beginning if you fall because the point isn't climbing the route but exhausting the muscles.

Another exercise Bob and I like is something I think of as progressions. Choose a red point project and climb the first 3 moves and step off. Repeat this after a short rest (<15 class="blsp-spelling-corrected" id="SPELLING_ERROR_9">maxi um, and finally 3 moves.

4 by 4 is another useful exercise which can be used for power or power endurance depending on your route choices. For power you should find a wall with a red point project and an easier climb together. Climb the project to the high point and fall. Immediately get on the easy one and top it. Lower off and go straight to the project. Repeat this 3 to 5 time or until crying.

Do 5 sets of "exercises" all together. Follow this by a a set of rock rings or hang board and then 3 sets of weighted pull-up (7 reps max).

Stay tuned for other power exercises for climbing.

Saturday, October 07, 2006

Periodization

If you are under the age 15 this post ain't for you. Periodization is a training technique used to improve overall climbing. Kids under 15 just need to climb like crazy because your body doesn't really get any benefit for this type of training. Look at all the pre-teen and teen climbers hitting 5.13 and 5.14 after only a couple years of climbing...You don't need it.

For the rest of us it is a battle, and then like myself... A war. I have read a lot on training and it boils down to some very simple ideas. Most of us don't train, we just climb. We work a project after a couple of warm-up laps, flail for a while and go home. This is fun but it is not training. We plateau soon enough, I was stuck at 5.10a for 2 years. To become better climbers we must work weaknesses and become systematic in our approach and this is where periodization comes in.

Periodization is training in block intervals on one type of climbing; endurance, power or power-endurance. Endurance is very important on longer route but also with changing styles of climbing. It takes much longer to climb a sport route than top rope and likewise longer still to climb trad. Power is important for bouldering and sport climbing. Power is called on to get that one HARD move. Power-endurance is needed when you feel that deep down nasty pump just as you are trying to make that next clip. It is being able able to climb for a period at near maximum power. We should train these individually to get the most benefit.

Bob and I have been following a 4-3-2-1 periodization schedule and I have seen good results (Over the last 12 months I have gone from climbing 5.10a to 5.10d and working my first 5.11.). It works like this;

  1. 4 weeks of endurance. Easy climbing at 2 grads below your onsite grade. Continuous climbing (up and down climb without touching the floor) for 10 minutes then switch belay. Some nights we would climb slightly harder routes but do laps (ie climb up and lower off). You should not feel a heavy burn doing this, if you are get on something easier.
  2. 3 weeks of power. 10 minute intervals of redpoint climbing or bouldering. One routine we use is to climb the first 3 moves then lower off, then 4 moves, lower, 6 moves lower, top out or high point and lower and then the first three again.
  3. 2 weeks of power-endurance. Here you want to chase the burn. You want that nasty deep burn every time you get on the wall. If you get the burn in less than 5 minutes...Too hard. If you last more than 10 minutes...Not hard enough.
  4. 1 week of rest. No climbing just allow yourself to heal before the next series.

Very impotent tips;

  1. Always warm up with easy laps. If you don't warm up well you are much more likely to get injured.
  2. Drink water while you are working out. Dehydration stops the body from performing well.
  3. Have a protein shake with in 30 minutes of the end of the workout. You body needs the protein substrate to build muscle and it is most effective when you are pumped.
  4. Take you vitamins. Vit C helps rebuild proteins (ie muscle) and a multi-vit will make sure you aren't missing any important things.
  5. If you don't have power you have nothing to endure! You should be be doing 3 sets of pull-up daily 5 times per week. Aim for 10 to 12 reps. If you can't get 10, do as many as possible and do the rest as negatives. If 10 is easy, do 5 to 10 Frenchies (Pull-up and hold at the top for 3-5sec then lower, pull up and then lower to 90 degrees, lock off and hold for 3-5 sec then lower and pull up and lower to 125 degree, lock off and hold for 3-5sec...that is one rep).
  6. Power is related to your strength to weight ratio. The heavier you are the worse it is. It is easier to loose weight than to gain strength. Cut out junk food, cut out between meal snacks. If you eat a reasonable diet and you are still not at your ideal climbing weight start running. 20 to 30 minutes 3-4 times per week.
  7. Train antagonistic muscles 2 times per week. These are the opposing muscles which you use for climbing. Injure can occur if a balance is not kept. A basic chest, tricept and shoulder workout will do fine. (Push-up or bench press 3 set of 10, tricept dips or extensions 3 sets of 10, shoulder press or handstand press 3 sets of 10 or max)
  8. Train core 2 times per week.
  9. With the above periodization, climb 4 times per week with endurance and power-endurance, 3 times per week with power (Needs more recovery).

SO...over all you should be climbing 4 times per week, running 3 times per week, working antagonistic and core muscles 2 times per week and following a reasonable diet. Post a comment if you have any questions or comments.

Noel
Saturday, September 23, 2006

Nubbin and others


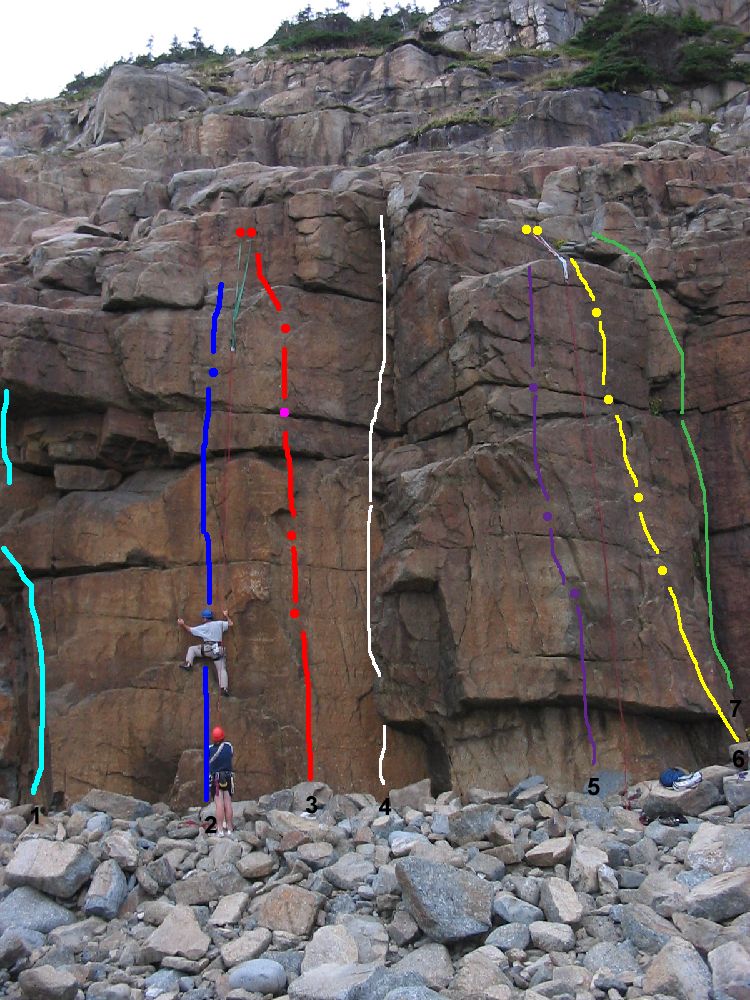
Bob, Tak and I were top roping 'Nubbin' when I took this picture. Tak is climbing and Bob is belaying/bottom anchor. The top rope anchor is set on two bolts which can be reached by carefully traversing right from the Iron Hand Rap Anchor. The second rope is over Candy. I almost have seven routes in this picture.

1 Farewell to Arms 5.11b A difficult trad climb I have never been on.

2 Nubbin 5.10c Trad climb with one bolt protecting the crux.

3 LSTD Project 5.11a/b Just put up this year. Three bolts and a piece of pro.

4 A Few Tense Moments 5.8 Trad climb in the corner. You can exit to the top of Nubbin.

5 Piece of Shit 5.10c/d Jays un-named route. I slashed my finger on it the last time I tried it.

6 Candy 5.7 Easiest sport line on main face. This route allows easy access to the top of Iron Hand and all the above routes.

7 Ivan's Corner 5.6 One of the original trad lines that has not seen much activity.

Wednesday, September 13, 2006

Hakuna Matata 5.9


Hakuna Matata is a nice moderate sport climb. The first bolt is at shoulder height. This is because of the shifting boulders at the base. It used to be at about 10 feet. It moves up the obvious corner to the roof where it gets interesting.

The 4th bolt is well placed just above the roof. There is a long reach to the first horizontal crack. It feels quite airy because you are just over the roof. Once into the cracks it is quite straight forward. There is a nice crack for gear (blue dot). The anchors are just above.

To the left in the corner is Ivan's Corner (5.7). This is a old trad climb. It shares the same start as Candy with the first bolt of Candy in green.

Saturday, September 09, 2006

Iron Hand 5.9+


Iron Hand is one of the earliest established route on Main Face rated as 5.9+. It climbs like a 5.10a/b.

Start in the corner with a mantle on the first ledge. Reach into the corner and work up to the ledge under the ceiling. Traverse left then follow a series of lay backs up to the anchors.

The anchors at the top of Iron Hand were replaced this summer by Jason Wall. Two lengths of SS chain are on bolts and are much better than what was once there.

The top of Iron Hand is easily accessed by walking over the ledge from the top of Candy.

Candy 5.7

Candy is the route in black on the right. It starts in the corner and travels left after the 1st bolt. Just above the 2nd bolt is a nice jug which leads into the horizontal gear crack. Top out after clipping the 3rd bolt onto a nice wide ledge where the top bolts are placed.

The route beside it is un-named and is about 5.10c/d. Jay has the first ascent and therefore the right to name it. I asked him what he was going to call it and his reply was "What...that piece of shit!?!" So by default I guess the name is... Piece of Shit.

I like the Piece of Shit. You start under a small ceiling and reach the first large horizontal ledge. Then you smear both feet onto the bottom of the face and reach for a crimp with the right. With no feet and one crimp you reach left for a vertical crack. This allows you to reposition your feet and gain the next horizontal crack. There are 2 bolts and a gear placement. We are going to place a 3rd bolt above the gear placement to primarily keep the route to the left side of the face. Currently people are just using the last bolt on Candy which is actually off route. Try out the piece of shit for yourself.

Friday, September 08, 2006

Morning Climb

Bob and I are going climbing tomorrow at 6:00am at Main Face (Sat).

Monday, September 04, 2006

Breakfast Club.

First time ever that Bob and I have been on MainFace at 6:00 am and two other climbers show up. Jeff and Matt crawled out of bed so they could climb before Jeff went to work at 12:00. Good on ya guys.

I revisited an old nemesis, Iron Hand. It is a trad climb with a rap anchor at the top. I first climbed it back in 1995 and I haven't been back since. It is graded as a 5.9+ but it feels harder (5.10a/b). You climb up a corner below a roof that requires a mantle and then a tricky reach for a pocket. When you get the pocket, you move to a horizontal crack and work it to the left from under the roof and follow a crack to the top. It feels fairly exposed and there is a good swing it you fall low while on TR.

The feet on the traverse are my problem. I have nothing to stand on so I got worked just hanging on to that ledge. It may be called Iron Hand but at the end it felt more like lead.

TR access is quite easy once you have climbed Candy.

Sunday, September 03, 2006

Stolen Gear

Wed Aug 30, 2006...some #$@% stole my climbing gear out of my car trunk. Things that are missing include
  1. Bluewater 60 meter 10.3mm climbing rope (only 3 months old).
  2. An array of quick draws (14 all together) DB Positron.
  3. Orange Mad Rock Climbing Shoe's
  4. Rock Empire Harness.
  5. Arc'terx Chalk bag
  6. Set of DB Camalots (.3 thru to 3)\
  7. 6 Petzl locking D's
  8. Various slings and 2 cordalettes.
  9. 60L pack

*As you can tell, it was a major loss!!!!

The #$@^%$ idiots who took this stuff probably have no idea what it is for and just tossed it. If they are stupid enough to either use it or try to sell it, I am hoping someone spots my gear. It is all marked with purple ID tape. If it is seen, get a hold of me thru Wallnuts Climbing Gym.

Thanks.

Noel

Strange Summer

It has been a strange summer. I thought this summer was going to be HUGE for climbing but quite the opposite. Where is everyone?!? A lot of the regulars are well not regular. In fact they are absent.

For me personally it has been great. I have been out more this year than ever before and I have learned a lot. My secret...mornings!!!

I climb 2x per week in the wee hours of the morning. I usually meet Bob at Tim's at 5:00am on Tuesdays. Same on the weekend, either Sat or Sun, depending on whats going on at home. It is absolutely Awesome being down on MainFace when the sun is rising.

I am also surprised by who is willing to climbing with us at that hour. Jason, Leo and Tak have all come out with us at the crack of dawn.

Next Post...Candy

Time for a Change

I apologize to all those who had great hopes for the Avalon Climbing Club but the interest just wasn't there. I hope someone else may pick up the torch in future but I just don't have the time.

I will continue to publish my own climbing experiences and interesting pictures but nothing in regards to a "club".

Noel